Introduction to Room Painting Preparations
Deciding to paint a room in your house is an exciting time. It brings the potential for transformation and the opportunity to imbue your personal style into your living space. However, you might be wondering, ‘how do I prepare a room for painting?‘ The answer lies in meticulous preparation.
The Importance of Preparation
Thorough preparation is the key to achieving a professional-looking finish when painting a room. It ensures the smooth application of paint, enhances longevity, and contributes to the overall aesthetic of the room.
Preparation involves more than just choosing the right color or paint type. It includes everything from clearing the room, cleaning and priming the walls, to protecting your furniture and flooring. By investing time and effort in the preparation stage, you can avoid common painting pitfalls and achieve a finish that you can be proud of.
Overview of Steps in Preparing a Room for Painting
Here’s a concise overview of the steps involved in preparing a room for painting:
- Room Clearance: This involves removing furniture, decorations, and window treatments to provide a clear space for painting.
- Wall Preparation: Here, you’ll clean the walls, repair any surface imperfections, and prime the walls to create an ideal surface for paint application.
- Protecting Your Space: You’ll need to cover your floor with drop cloths and apply masking tape to baseboards and trims to protect them from paint drips and splatters.
- Gathering Your Painting Supplies: Select the right brushes, rollers, and the correct type of paint for your project.
- Safety Measures: Ensure proper ventilation and use suitable protective gear to maintain safety while painting.
By following these steps, you’ll be well on your way to creating a beautiful, freshly painted room. For a detailed guide on how to paint a house, consider reading our step-by-step guide. Remember, preparation is the foundation of any successful painting project. Therefore, it’s worth taking the time to do it right.
Step 1: Room Clearance
To begin the process of preparing a room for painting, the first step is to clear the room. This involves removing furniture and decorations, as well as taking down window treatments and coverings.
Removing Furniture and Decorations
Start by removing all movable items from the room. This includes furniture, rugs, and decorative items. If you’re unable to move large pieces of furniture out of the room, push them to the center and cover them with a drop cloth or plastic sheeting to protect them from paint splatters and spills.
Remember to also remove wall hangings, photos, and clocks. If you have shelves, empty them and take them down if possible. The key is to create a clear space that allows you to move freely around the room while painting.
Taking Down Window Treatments and Coverings
Next, take down any curtains, blinds, or other window treatments. Remove hardware such as curtain rods and brackets to expose the area around the windows for painting.
Light switch covers and outlet plates should also be removed. This not only keeps them clean but also allows for a smoother painting process. Keep all the screws and hardware in a safe place so you can easily reinstall them after the paint job is complete.
Clearing the room might seem like a strenuous task, but it’s a crucial step in preparing a room for painting. It not only protects your belongings from potential paint spills and splatters but also makes the painting process easier and more efficient. Once your room is cleared and ready to go, you can move on to cleaning and preparing the walls for painting.
Step 2: Wall Preparation
Proper wall preparation is one of the most vital steps when you wonder how do I prepare a room for painting? It involves three critical tasks: cleaning the walls, repairing surface imperfections, and priming the walls.
Cleaning the Walls
Before you start painting, it’s essential to clean the walls thoroughly to remove any dust, dirt, or grime. A clean surface will allow the paint to adhere better, resulting in a smoother and more durable finish. To clean the walls, you can use a mild detergent mixed with warm water. Use a sponge or a soft cloth to gently scrub the surface. For stubborn stains, a solution of baking soda and water can be an effective cleaning agent. After cleaning, make sure to rinse the walls with clean water and let them dry completely. For more details on how to properly clean painted walls, you can refer to our guide here.
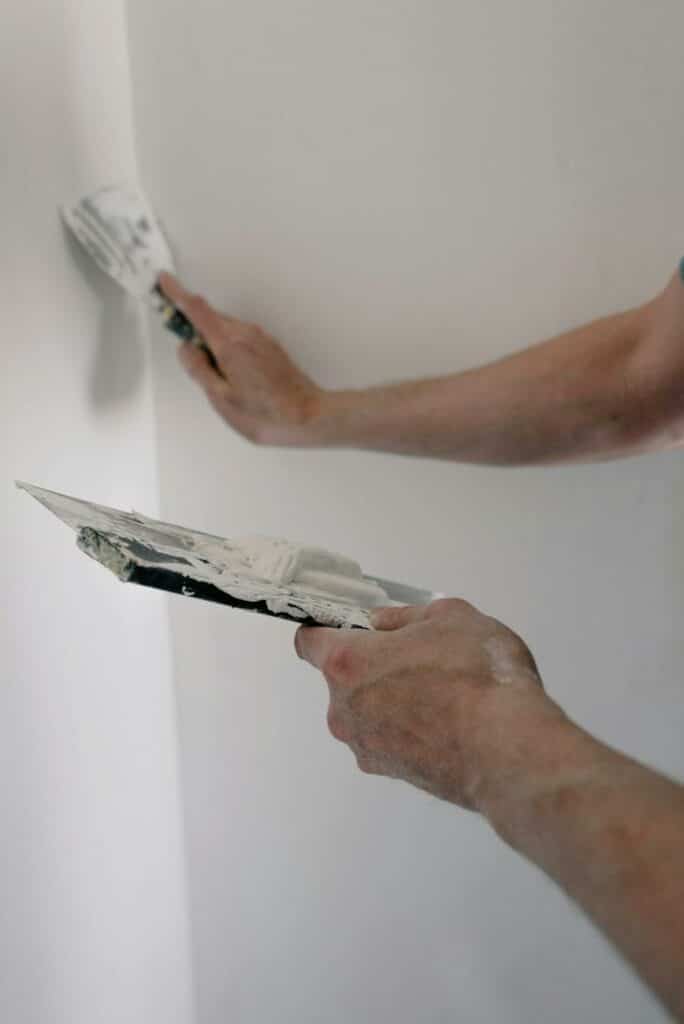
Repairing Surface Imperfections
The next step in preparing your walls for painting is to repair any surface imperfections, such as cracks, holes, or dents. This can be done using a putty knife and a suitable filler or compound. Apply the filler to the damaged area, smooth it out with the putty knife, and let it dry. Once it’s dry, use sandpaper to smooth the surface until it’s level with the rest of the wall. If the damage is severe, you might need to consider professional painting services that can repair wall damage before painting.
Priming the Walls
Priming the walls is the final step in wall preparation. A primer is a special type of paint that creates a uniform surface for the topcoat. It helps to hide any previous colors, stains, or repairs, ensuring that the new paint color looks consistent and vibrant.
Apply the primer using a paint roller for large areas and a brush for smaller areas and edges. Let the primer dry completely before proceeding with the paint. Priming is especially important if you’re painting over dark colors or a stained surface. For more information on how to properly prime your walls, refer to our step-by-step painting guide.
By following these steps, you’ll ensure that your walls are perfectly prepared for painting, leading to a professional and lasting finish.
Step 3: Protecting Your Space
Once the room is cleared and the walls are prepared, the next step in the process of preparing a room for painting involves protecting the space. This step is critical to ensure that your floor and trim are not damaged or stained during the painting process.
Covering the Floor with Drop Cloths
Protecting your floor is essential when painting a room. The easiest and most efficient way to do this is by covering the floor with drop cloths. These cloths, often made from canvas, plastic, or paper, act as a barrier between the floor and any paint that may drip or splatter during the painting process.
To effectively cover your floor, spread the drop cloths across the entire surface, ensuring all areas are covered. Secure the cloths in place with painter’s tape to prevent them from moving or slipping while you work. Remember, it’s better to overlap the cloths than to leave any parts of the floor exposed.
Applying Masking Tape to Baseboards and Trim
In addition to protecting the floor, it’s also important to protect the room’s baseboards, trim, and other non-paintable surfaces. The most effective way to do this is by using masking tape.
Apply the masking tape along the edges of the baseboards and trim, ensuring it adheres properly. This will create a barrier that prevents paint from reaching these areas. Make sure to press down on the tape to seal it and prevent paint from seeping beneath it.
While these steps may seem time-consuming, they are crucial in the process of preparing a room for painting. By adequately protecting your space, you can ensure a clean, professional-looking paint job. For more information on preparing a room for painting, take a look at our step-by-step guide for how to paint a room.
Step 4: Gathering Your Painting Supplies
In the process of preparing a room for painting, another important step is to gather all the necessary painting supplies. This includes the selection of the right brushes and rollers, as well as the appropriate type and color of paint.
Choosing the Right Brushes and Rollers
The choice of brushes and rollers can significantly impact the quality of your painting job. As a rule of thumb, brushes are generally used for smaller areas and detail work, while rollers are used for larger, flat surfaces.
When it comes to brushes, there are two main types: synthetic and natural bristle brushes. Synthetic brushes are ideal for water-based paints, while natural bristle brushes work best with oil-based paints.
Rollers, on the other hand, come in various sizes and nap lengths. The nap length refers to the thickness of the roller cover. A shorter nap (1/4 to 1/2 inch) is suited for smooth surfaces, while a longer nap (3/4 to 1 inch) is best for rough or textured surfaces.
For a more detailed guide on selecting the right brushes and rollers for your painting project, check out our article on what are the latest innovations in painting tools and equipment?
Selecting the Correct Paint Type and Color
The type of paint you choose is largely dependent on the surface you’re painting and the desired finish. There are two main types of paint: water-based (latex) and oil-based. Water-based paints are easy to use and clean up, dry quickly, and have low VOC levels. Oil-based paints, on the other hand, are durable and stain-resistant, making them suitable for high-traffic areas and surfaces that come into contact with grease or grime.
Choosing the right color is equally important and often a personal preference. However, it’s worth considering factors such as the room’s size, lighting, and purpose when deciding on a color. Light colors can make a small room appear larger and more open, while dark colors can add depth and coziness.
To help make this process easier, you might want to consider consulting with a professional. Many painting services offer color consultation services to help you find the perfect color for your space. For more tips on how to choose the right paint color, check out our article on how natural light impacts paint colors.
Step 5: Safety Measures
Safety is paramount when undertaking any painting project. Ensuring proper ventilation and using suitable protective gear can safeguard your health and wellbeing during the painting process.
Ensuring Proper Ventilation
The fumes from paint can potentially cause nausea, headaches, or dizziness. To mitigate these risks, it’s important to maintain good air circulation throughout the painting process. Open windows and doors to allow fresh air to circulate in the room. If the room lacks windows, consider using fans to increase air circulation.
Ensure that the room remains ventilated not only while you’re painting but also during the drying process. This allows the paint fumes to dissipate quickly and reduces the risk of inhaling potentially harmful vapors.
Using Suitable Protective Gear
When preparing a room for painting, protective gear is essential. This includes gloves, safety glasses, and a face mask or respirator.
Gloves protect your hands from direct contact with paint and any cleaning solvents you might be using during the preparation phase. Safety glasses shield your eyes from any paint splatters or debris during the wall repair and cleaning process.
A face mask or respirator is crucial to avoid inhaling paint fumes, dust, or any other airborne particles. A simple face mask can provide protection from dust, while a respirator is advisable when using oil-based paints or solvents that produce stronger fumes.
Remember, safety should never be compromised. Taking proper precautions ensures you can complete your painting project without risk to your health.
| Safety Gear | Purpose |
|---|---|
| Gloves | Protect hands from paint and solvents |
| Safety Glasses | Shield eyes from paint splatters and debris |
| Face Mask/Respirator | Prevent inhaling paint fumes, dust, and airborne particles |
The safety measures highlighted here form an integral part of the room preparation process for painting. To learn more about the steps involved in painting, refer to our ultimate step-by-step guide for how to paint a house.
Frequently Asked Questions
When it comes to preparing a room for painting, several common questions often arise. Here, we answer three of these questions related to time considerations, encountering mold or mildew, and the possibility of painting over wallpaper.
How Long Should I Allow for Room Preparation?
The time required for room preparation greatly depends on the room’s size, the number of items to move, and the wall conditions. Consider the time for clearing out furniture, cleaning and repairing the walls, and setting up protective materials. On average, allow a full day for thorough room preparation. For more in-depth information on time considerations and how to efficiently prepare a room, visit our guide on how to prepare a room for painting.
What Should I Do If I Encounter Mold or Mildew?
Encountering mold or mildew during room preparation requires immediate attention. The area should be cleaned with a specialized mold-killing product or a bleach solution. Ensure the area is completely dry before you proceed with painting. If the mold or mildew problem is widespread, it’s advised to seek professional help. Our article on how professional painters repair wall damage before painting provides more detailed information.
Can I Paint Over Wallpaper?
While it is possible to paint over wallpaper, it’s not often recommended due to the potential for poor results. However, if the wallpaper is in good condition and adhered well to the wall, it can be done. The wallpaper should be primed before painting to prevent the wallpaper pattern from showing through the paint. For a step-by-step guide on how to do this, check our article on can you paint over wallpaper, and how is it done?.
These answers should aid you in your room preparation for painting. Remember, good preparation is key to achieving the best results. If you need more information or have other questions, our list of painting services and articles can provide further assistance.